- v50 information can now be added to pages in the main namespace. v0.47 information can still be found in the DF2014 namespace. See here for more details on the new versioning policy.
- Use this page to report any issues related to the migration.
v0.31:Dwarf fortress mode
| This article is about an older version of DF. |
- This is a comprehensive reference guide for Fortress Mode.
If you are looking for a fortress mode tutorial see the Template:L or Template:L.
Fortress mode is the most popular mode of gameplay in Dwarf Fortress and what most people are thinking of when they talk about the game. In fortress mode, you pick a Template:L, then assign your seven initial Template:L some starting Template:L, equipment, provisions, and Template:L to bring along. After preparations are complete and your hardy explorers Template:L, they'll be faced with the fortress site you picked down to every detail, from geologically appropriate stone types to roaring waterfalls to ornery hippopotami. Rather than control individual dwarves, you design everything and your dwarves go about implementing your designs on their own.
Unlike fortress mode, Template:L is a sort of advanced open world version of rogue or nethack taking place in the same worlds used for fortress mode. In adventure mode you control a single adventurer (character) who travels around, takes on quests, fights, dies, possibly visits your abandoned forts, etc, in a turn-based (rather than real-time) manner. See Template:L for more information.
Goals
As a construction and management simulation game, there are few goals imposed upon the player by the programming.
The main goal, if any, is to take your seven initial dwarves and expand them into a thriving community with skilled Template:L, Template:L and Template:L. Make your dwarves Template:L with fine Template:L, valuable Template:L, precious Template:Ls and protect them from Template:L with deadly Template:Ls. Make sure they have plenty of Template:L and Template:L, by way of Template:L above and below ground and keep them Template:L in Template:L and Template:L.
Of course, every dwarf loves precious Template:Ls, but the only way to find them is Template:L down, down, far down. Make sure you don't dig too greedily, or too deep, for many creatures dwell in the Template:L below and not all are friendly to dwarves....
And don't forget the alcohol. Dwarves get very unhappy without a good stiff drink when the urge hits.
Some more specific Template:L are available here, compiled by fun-loving players from all around. There are also a wide variety of player-created game mods which can add new creatures/crops/items/etc, or increase the difficulty of the game.
The World
To play dwarf fortress in any mode you must generate a world that includes a dwarven civilization. See Template:L for detailed instructions on generating a world. After at least one world has been generated you will be able to start the game. Only one game may be going on in at world at the same time.
Non-dwarven civilizations can be played in fortress mode if you modify the raws to add the [CIV_CONTROLLABLE] token to other entity definitions. This is not recommended for new players. See the Template:L for information on how to do this.
Geographic Features
The main features of a world are Template:Ls on the surface and Template:L under the surface, some of which may contain Template:Ls. Other surface features that are significant, but which aren't biomes strictly speaking, are Template:Ls, Template:Les, and Template:Ls.
There are also Template:Ls and magma seas everywhere underground which your dwarves will most likely encounter, but you can't see these on the world map and won't see them on the local map until you dig into them. There may also be other fun things underground that you can't see. You will have to find these on your own, if they exist.
Inhabitants
Every playable world will be inhabited by various Template:Ls, Template:Ls, and Template:Ls (including Template:Ls and Template:Ls) in addition to your dwarves. Even if your dwarves are minding their own business they are practically guaranteed to encounter all of these types of inhabitants at some point in the form of wildlife, invaders, or rampaging forces of nature.
History
Given that your world includes creatures and civilizations capable of independent action, it also has a History that is viewable in Template:L mode. Historical events will show up in Template:L and other artwork created by your dwarves. Historical dates are expressed in terms of the Dwarven Template:L.
You will also be making history as events occur in your fortress and these events will be recorded for all time in the annals of your world, even if you'd rather that they not be. These events may later become the subject of various Template:Ls and Template:Ls created by your dwarves or those in a later fortress.
Embarking

- Main article: Template:L
Before starting to build a fortress you must pick a site, assign skill points to dwarves, and buy starting equipment. This is known as Embarking and is a major subject in and of itself. See the Template:L guide for all of the details. Also see Template:L for more information on outfitting your expedition.
After you embark, the real game begins.
Gameplay User Interface
- Also see: Template:L
Your main view of the in-game world is that of a multi-layered environment which you can move in the four main cardinal directions as well as up and down Template:Ls in elevation. The generated worlds are made of tiles, each representing anything in the world. There is also a command menu that lets you set commands that your dutiful dwarves will attempt to follow.
This section covers most of the screens and user interface elements used after embarking, at least in brief. It does not necessarily tell you how to accomplish every task you might need to, but instead just describes what you see on the screen and what various keystrokes do.
Later sections in this document and many other articles on this wiki help you tie all of this together by describing the sequence of actions needed to accomplish various things in the game; this section is mostly a reference for the UI itself.
Common UI Concepts
About Key Symbols
This document and most documents on the wiki use key symbols that look like t to indicate what keys are used for an operation. Note that these are case sensitive. In order to save space, Shift+t will be written as T. So t means "press the 't' key without the shift key" and T means "hold down shift and press the 't' key". Sequences of keys will be written with dashes between them. So a-b-C means "press 'a', then press 'b', then hold shift and press 'c'".
| Esc | Go back to the previous screen/menu |
| ↑ ↓ ← → | Change active menu option or move cursor |
| - + | Alternate menu selection keys |
| Enter | Select menu option |
Often you use the directional keys ↑ ↓ ← → and Enter to make menu selections, but almost as often you will need to use the alternate selection keys (- and +) to make menu selections. Generally speaking, when dealing with menus, if the directional keys don't work try -/+. This is usually the case when you need to select from a list but the directional keys are being used to control the map cursor.
Esc will almost always take you back to the previous screen until you get to the top level of the UI, at which point it will display the options menu (see below).
Pausing and Resuming
| Space | Pause/Unpause the game |
Most of the commands, except for the squads command, will automatically pause the game when you initiate them, but if you want to pause or unpause the game without initiating a command use Space. You will see *PAUSED* appear in the upper left corner of the window when the game is paused. Some announcements will pause the game automatically and you will have to unpause it manually to proceed.
Main Screen
| Zoom in and out | |
| Tab | Toogle mini-map and command menu. |
| F11 | Toggle fullscreen mode |
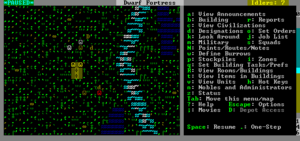
The screen at the top level of the user interface hierarchy consists of the main map, a command window, and an overview mini-map area along with a few status indicators around the edge. While the main map is always visible at the top level of the UI, you can use the Tab key to show and hide the command window and overview map areas, giving you more space to view the main map if desired.
Options Screen
| Esc | Enter options menu (if at top level) |
| Esc | Move back up one UI level (if not at top level) |
Assuming you are at the top level of the user interface looking at the map, you can hit Esc to enter the options menu. This allows you to do things like save or abandon your game.
- Return to Game - Exit the options menu. You can also just press Esc.
- Save Game - Saves the game and exits to the main menu screen.
- Key Bindings - A UI for changing the Template:L
- Export Local Image - Use this to export each level of your map as .BMP files for use on such things as the Dwarf Fortress Map Archive
- Music and Sound - Options related to the Template:L
- Abandon the Fortress (or Succumb to Invasion) - This Template:Ls the fortress and then saves the map to the world's data files for later use. Once you abandon a fort, all of your dwarves cease to exist, all of your livestock dies, and all items including corpses will be scattered around the map before it is saved. This is how you "give up" on a fortress. You might later Template:L the fortress with a new group of dwarves or visit it with an adventurer in Template:L.
Main Map
| ↑ ↓ ← → ( + shift) | Move map view around |
| 8 2 4 6 7 9 1 3 (keypad) | Move map view around |
| < > | Move one Template:L up or down. |
| F1 | Zoom to starting location (default hotkey) |
The main map window is what you will be looking at the majority of the time. This is where all of the action happens.
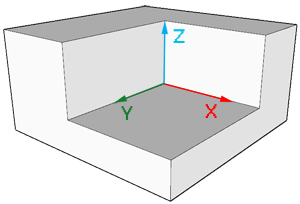
While the play area itself is three-dimensional, the window is not; you can only view one Template:L at a time. You can change which Z-Level is currently displayed using < and >.
On the far right side of the screen is the depth bar showing you the approximate depth, below or above ground, of the current Template:L that the map is displaying. This indicator is relative to the surface, so it will change if you move the map around a map with a non-flat surface, even if you don't press < or >.
Map Cursor
| 8 2 4 |

