- v50 information can now be added to pages in the main namespace. v0.47 information can still be found in the DF2014 namespace. See here for more details on the new versioning policy.
- Use this page to report any issues related to the migration.
v0.31:Bentgirder
Bentgirder is a Dwarf Fortress package for beginners. With it, you skip Template:L, finding an Template:L, and Template:L. Just unzip the Bentgirder package to the same directory as Dwarf Fortress, and play along with this tutorial.
You can get Bentgirder here: Download If you're using a graphical tile set, you will need to copy over the modified raw files. If you're using the Template:L there's an automatic save updater that will do this for you. If you have already created a world, you can use the same embark file used for Bentgirder. This gives you the same Template:L, but you're on your own for finding a location.
Any questions or comments about Bentgirder? See the official forum thread.
Lesson One: Getting Started
Starting the game
At the main menu, choose to continue a game. It will ask you to pick a game region, but there should only be one choice: region0, the location of future outpost Matthob, aka Bentgirder.
Setting up your screen
| Used keys | |
|---|---|
| Zoom in and out. | |
| Tab | Toogle mini-map and command menu. |
| ↑ ↓ ← → ( + shift) | Move around. |
| F11 | Toggle fullscreen. |
| F1 | Zoom to starting location. |
The default screen setup is a little crowded. The actual game view is on the left hand side. You can use the tab key to hide the mini-map and the command menu. Just keep tapping tab to cycle through different configurations. You might want to keep the command menu visible for easy reference. That seems like a lot of commands, but some of them are more useful than others.
In the most recent versions of Dwarf Fortress, you can re-size the window with the mouse, and zoom in and out with the mouse wheel. Also, you can toggle the full-screen mode with F11, but that will make it harder to read this as you play.
You can use the arrow keys (↑ ↓ ← →) to scroll around the map. To move 10 tiles at once, use shift+ direction. If you get lost, press F1 to center the screen where you first embarked.
Game Options
Esc brings up the game options menu, which includes things like volume control, and the quit & save option. Note there is no save & continue option. Dwarf Fortress is hardcore. If your fortress goes south, you don't go back to your last save, you have to struggle through, or abandon and start over. Remember, losing is Fun!
When in doubt, pause the game
The game starts paused. Use the space bar pause and unpause your game. It might be best to leave it paused for now. Without any orders from you, your dwarfs will only mill around and eat.
Looking around: k
| Used keys | |
|---|---|
| k | Look around. |
| ↑ ↓ ← → ( + shift) | Move around. |
First, lets make sense of this jumble of characters that is the main screen. Press k to activate the look mode. This pauses the game, and puts a yellow X in the middle of the screen. That X is your cursor. Use the arrow keys or number pad to move it around. The right side of the screen will show a list of what is in the selected tile. It also shows that the ground below is made of.
The screen will be centered on a 3x3 brown square. That's the wagon full of supplies to get you through the year. Nearby, you will see your seven dwarfs, a few animals, and lots of trees and shrubs. To the right, there's a brook. The dark blue patches that show up as "empty space" are ponds.
Opposite the brook is a hillside. The green up-arrows are upward slopes, so your dwarfs can walk up this hill easily. Beyond that is a silt loam wall. That's just a kind of dirt. It's called a wall because the whole tile is full of dirt.
Press Escape to end look mode.
Moving up and down
| Used keys | |
|---|---|
| < > | Move one z-level up or down. |
Dwarf Fortress is a three dimensional game. Anywhere you can use the arrow keys to move a cursor or the map, you can use < and > to move vertically. Each step is called a z-level. You can only see one z-level at a time. Undiscovered earth is blacked out, while empty space above ground show as light blue. In the bottom right of the screen, there's a display of the current z-level. On the right is also a scroll bar that shows where you are relative to sky (light blue) and earth (dark). The wagon is parked on level 146.
If you move the display up one step, (to 147) most of the map will appear light blue indicating empty space, but the hill to the left now looks normal. Note that the up-arrows, viewed from this level now show as down arrows. Conversely, if you go down to 145, all you can see is the bottoms of the ponds and the brook (dark blue). If you follow the brook south, there's a valley at the bottom edge of the map. From level 146 it appears as empty space, but on 145, it is normal terrain.
View creatures: v
| Used keys | |
|---|---|
| v | View creatures. |
| ↑ ↓ ← → ( + shift) | Move around. |
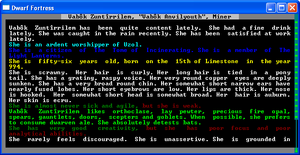
k is good for looking at the map itself, but to get more information on creatures (including your dwarfs) use v. This works a lot like "k-mode", but the right side menu now shows detailed info on the creature closest to the cursor. If you're between creatures, or if there's more than one in a tile, press v again to cycle between creatures.
There are four sub-sections here: general, inventory, preferences, and wounds. For your dwarfs, general shows what skills that dwarf has. Inventory shows what items the dwarf is carrying and wearing. Preferences shows what labor the dwarf will do. (This will be important later.) Wounds shows the creature's injuries as color codes. Healthy body parts are shown as bright white.
Secondary selection keys: +, -
In many modes, you can scroll though the information in the right-hand menu with the secondary select keys, + and -. For example, scrolling through lists of skills when viewing a dwarf.
Unit List: u
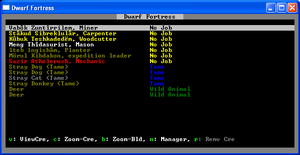
Press u to bring up unit list. This shows every living thing on the map. That's your seven dwarfs, two dogs, two cats, a donkey, and some wild deer. ("Stray" animals are tame, but not attached to any individual dwarf.)
There are several useful functions here. Use v to get more info on the highlighted creature. For the animals, this jumps straight to a description. For dwarfs, there is an intermediate screen showing the dwarf's owned objects.
Use c to go back to the map, centered on the highlighted creature. For example, we could find out where those wild deer are hiding. This puts you into the view creature mode, just like the v command, above.
Fortress Status: z
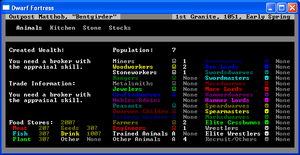
Instead of scanning around the map, you can press z to get an overview of the whole fortress from the status screen. This screen has a lot of information:
- Current date In the upper right corner.
- Dwarven population Sorted by profession, civilians in the center, soldiers on the right.
- Food and drink In the lower left corner.
- Fortress wealth including created, imported, and exported wealth, on the left side.
Since your dwarfs don't know how much stuff is around (without a Template:L) or how much stuff is worth (without a Template:L), the food and wealth information is not helpful. (More on that later.)
Lesson Two: Meet Vabôk the Miner
She may not look tough, but Vabôk is your only miner and that makes her very important.
Designation Menu: d
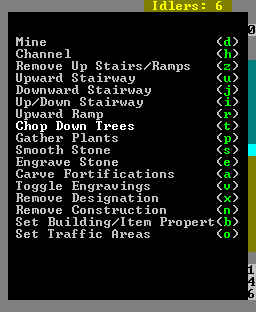
Enough looking around, let's start Template:L! Press d to bring up the designations menu. This gives us the cursor, and a list of options, each with a letter.
Let's go straight down, right next to the wagon. For that we need downward staircase. According to the window, that's j. Press j and downward staircase becomes highlighted.
The designation mode assumes that you want to mark a rectangular area. To make a designation, press enter to mark one corner, move the cursor to the opposite corner, and press enter again. You can also use the mouse, which is easier for small designations, like the one we're about to make.
Since we only need a small staircase, just click one square. The square is now marked with a > sign. As soon as we unpause, Vabok will walk to the tile, and carve a staircase into the dirt.
One problem, though. A designation doesn't cross z-levels. If you look at the level below, you'll see that the square below is exposed, but does not contain a staircase. We need to designate an upward staircase (u) in that square before we can dig any further.
Once that's taken care of, we can use the regular dig designation d to dig horizontally. We need some space for shelter and storage, so make a tunnel north or west, and then expand it into a big underground room.
Note that in designation mode, any tile that's next to water will blink blue. They also blink red for hot stones (near lava). This is warn you against mining into water and flooding your fortress. If you dig north of the wagon, you might get a damp stone warning for no obvious reason. There are a few tiny ponds on this hill above, which triggers the damp stone warning, but isn't really a risk if you dig into it. Just don't try to dig upwards from there!
Removing designations
If you make a designation by accident, you can remove it from the designation mode. Choose remove designation, (x) and mark the tiles you want to un-designate. If Vabok has already mined it out, You'll need to construct a wall to fill it back in. More on that once we get to Meng the mason.
You have struck gypsum!
Template:L just disappears as it is mined out, but Template:L is left behind in big chunks. There is an outcropping of stone nearby, north and west of the wagon. Template:L is a type of stone that can be made into Template:L. There is also some useful Template:L nearby, a source of Template:L for your forge, and clusters of agates, a type of low-value Template:L.
Announcement list: a
Most of these discoveries will be announced by a message at the bottom of the screen
Press a to see previous announcements. As you fortress grows, these come up more and more often, so it's easy to miss them. Also note that you can zoom z to the location of an announcement from here.
Experience
The more Vabok digs, the more Template:L she gets in mining. As her skill increases, she'll dig squares out quicker and destroy less Template:L, Template:Ls, and Template:L, as she goes.
This is true of all skills in Dwarf Fortress. Dwarfs improve their skills through practice. More skill means higher quality work, done faster. Keeping your dwarfs working and learning is the key to a thriving fortress.
Other Designations: cutting trees, gathering plants
While we're waiting for Vabok to finish our new digs, (pardon the pun) we can put our other dwarfs to work with other designations.
Choose the "chop down trees" designation t, and mark a big swath around the wagon. Then do it again with "gather plants", p. Your dwarfs will quickly go to work on these tasks.
That's three out of seven dwarfs hard at work. Not bad for just knowing one command! Try to keep Vabok busy expanding and exploring as you continue this tutorial.
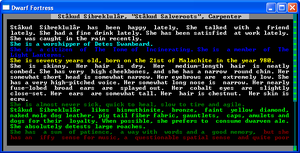
Lesson Three: Meet Stâkud the Carpenter
Building: b
To get any carpentry done, we need the appropriate workshop. Press b for the build menu. There are three pages of things that can be built here, and some of these entries lead to sub-menus. You can use the secondary select keys here, and each entry has a shortcut key as well. We are looking for workshops. Press w for the shortcut. The carpenter's workshop is on the first page here, with the shortcut c.
Now it's time to place the workshop where we want it. Since there's not much room underground, lets build it on the surface for now. It's trivial to break down a workshop and build a new one, so it doesn't have to be perfect.
The last step is choosing the materials to build it out of. Like most workshops, it can be built out of wood, metal, or stone, and it only takes one unit of materials. Our woodcutter has been hard at work, so there is some wood lying around, and there are a few tower-cap logs on the wagon, just in case. If Vabok has hit usable stone, that will appear here as well. Materials are sorted by distance from the building site, and they are all equally good, so just take the first one.
Stâkud will haul the selected building materials to the chosen location and start building his workshop.
Workshop Control: q
Press q for the view room mode. This works a lot like view creature mode. Move the cursor near a room, and you'll get some options listed in the right panel. The only rooms so far are the new carpenter's workshop and the wagon. The wagon's only option is to tear it down, but the workshop has the all important "add new task" option.
This brings up a list of things that can be built at this workshop. For now, lets build some beds. Our dwarfs are going to get tired eventually, and beds can only be made from wood. Note that you can't specify what material to build the beds out of. Stâkud just grabs some nearby wood and starts working.
Stockpiles: p
Kubuk has been leaving cut-down trees all over the place. Why don't we move them all closer to the carpenter's workshop so Stakud doesn't have to drag them so far?
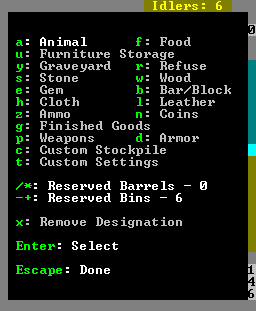
Press p for the stockpiles mode. Making a stockpile works just like a designation, but with no mouse control. We want a wood stockpile, so press w to highlight wood. Then mark the opposite corners of a small rectangular area near Stakud's workshop. The area is filled in with = signs. As soon as the game resumes, all your dwarfs will run to fill the stockpile with logs.
Why stop there? The beds that Stakud is building are just cluttering up the workshop. Lets make a furniture stockpile on the opposite side. Note that there is some furniture on the wagon: an anvil, a bucket, and a few empty bags. (In the future, you can use the q command and then s (for settings) on the stockpile to specify exactly what you want stored in each stockpile. Part of the learning curve in DF is figuring out what stockpiles store which things!)
Vabok should be about done clearing space underground, and all these rats are making me nervous. Create a big 10x10 food stockpile in the cleared space.
You can use k to look at the contents of your stockpiles. Take a look at your new beds, the enormous quantity of booze, and the barrels of revolting organ meats.
Eventually, you will want to move all your workshops and stockpiles underground. There are creatures that will steal your things. Moving everything underground is safer. Building them on the surface is just to get started quickly.
Quality symbols
Notice that your new creations have symbols around their names, like -pine bed- or +cedar bed+. These are quality indicators. Items with no symbols are minimum quality crap. As a general rule, more lines mean more quality, which means the item is worth more money.
- -double value-
- +triple value+
- *quadruple value*
- ≡five times base value≡
- ☼twelve times base value☼ -- This is called a masterpiece, and you get an announcement every time one is made.
Placing Furniture (beds)
Dwarfs can't use a bed while it's in the stockpile. To set up a bed properly, use the build mode again. Bed is the second option, shortcut b. This is just like how we built the workshop, but instead of a log, the only component is a bed. If there isn't an unused bed in a stockpile (or the workshop itself) you get the cryptic message, "Need bed". Beds and other furniture needs to be constructed at a workshop before it can be built on the map.
A lot of the things in the build menu are pieces of furniture that can be created at your carpenter's workshop: Tables, chairs, doors, hatch covers, and so on.
Bins and Barrels
Besides beds, the most important things a carpenter will make are Template:Ls and Template:Ls. Barrels are used to hold food and drink. Bins are used to store nearly everything else. Try to keep a few extras of each.
Lesson Four: Meet Ïteb the Farmer
Ïteb has already been working on the surface, gathering useful plants, but his main function is to plant a farm.
Farming
All the seeds you have are for dwarven crops that grow underground. Farms can only be built on soil or muddy stone. Dig an area for your farm, one z-level below the surface and near the brook or a pond. A three by three area will easily feed all your dwarfs. Make it four-by-four if you want a big one.
Now it's time to build a farm plot. It's in the build menu, and the shortcut is p. Changing the size of your plot with u,m,k, and h. u and k make it larger, hand m make it smaller. (This awkward method is used a very few places in Dwarf Fortress.) As soon as you exit build mode, Ïteb will build the new plot.
Now watch as Ïteb comes and builds the fields. Once your plot is constructed, use q to view its settings. Here, you can use the secondary select to choose a crop to grow for the current season. You can also use a-d to plan other seasons of the year. What to grow first?
Plump Helmets: the staff of life
Plump helmets are the best thing to grow in a new fortress. They can be eaten raw, with no preparation required. You can grow them year-round. They can also be brewed into dwarven wine, but more about that later. You have a bag of seeds for nearly every dwarven crop in your starting supplies, but none are as immediately useful as plump helmets. You can experiment with the other crops with experience.
Once you make your selection, Ïteb will start bringing seeds (called "spawn") to plant. If you made a big farm, you might get an alert that Ïteb is out of plump helmet spawn. Don't panic. That is just temporary. Every time a dwarf eats (or brews) a plump helmet, a spawn seed gets spat onto the floor. Eventually, these seeds get gathered back into your food stockpile, with the rest of the seeds.
Lesson Five: Meet Meng the Mason
A mason's workshop is very much like the carpenter's workshop, only it makes things out of stone. Since you will soon be neck deep in stone, it's a very attractive choice for building material. A mason can build a lot of the things that a carpenter can, plus a few that can only be made from stone.
What's in a name?
Some items have different names, depending on what material the item is made out of. Stone chairs are called "thrones" and stone chests are called "coffers". Don't get confused! They work exactly the same. There are a lot of items that have multiple names, like Template:Ls (aka caskets or sarcophagi), Template:Ls (aka mugs or cups), and Template:Ls (aka waterskins or vials).
What's Template:L?
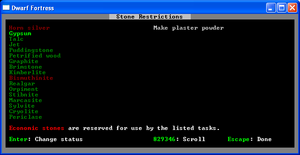
One of the options under the Template:L screen is Template:Ls. (Remember, bring up the status screen by pressing z). This is where you direct your dwarfs which stones are reserved for special uses and which can be used to make any old thing (Template:L, Template:Ls, Template:L, etc). This prevents a future engineer from taking a very valuable (say Template:L) stone and making a Template:L mechanism out of it. Gypsum is reserved as a component of Template:L, but we have an abundance. Go ahead and hit enter when gypsum is selected to change it from red (unavailable for general use) to green (available).
Build a trade depot
Your fortress is not isolated. Merchants will come to trade several times a year. This is a great failsafe. If you need more food or drink, if you need another pick or axe, if you need thread or cloth or even a bag of sand, you can trade for it. But the merchants will not visit you if you don't have a trade depot.
Start one from the build menu, shortcut D. Since merchants need to access it, I suggest building it on the surface. It's a big 5x5 room, and it takes three units of building materials. It's also one of the few buildings that need to be designed before being built. This means a building designer has to work on the area before the actual building process begins. Fortunately, Meng has this skill as well as masonry.
Actual trading is handled by the fortress broker, a position to which you can appoint any dwarf.
Assign Nobles: n
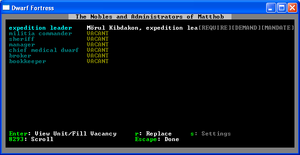
Press n to bring up the nobles and administrators screen. We need to assign a broker, so use the arrow keys to move the highlight to broker, and press enter. This brings up a list of dwarfs. Once you highlight a dwarf, any relevant skills will be shown on the right. We have one dwarf with the Appraiser skill: Mörul Kibdakon. He is already our expedition leader, but that's OK. Mörul also has medical skills, so you could set him up as chief medical dwarf. (More on medicine when we get to him.)
While we're at it, let's appoint a bookkeeper, to fix all those annoying question marks in the status screen. Sadly, none of our starting seven have the proper skills for this job. You can assign an unskilled dwarf to this position, but it will take much more work for your records to be made accurate. If you've gotten any migrants by now, you could appoint a useless peasant to this role. If not, then one of the seven founders can take the job for now.
Notice that once you select a bookkeeper, the nobles screen will show a red "REQUIRE" warning on that line. If you highlight that line and press enter, it shows you what that noble or administrator needs. In the case of the bookkeeper, that's a "meager office".
Make an office
All an office really needs is a chair. Adding a table is customary as the office holder will often eat in the office, and will complain if there isn't a table. If you want to make a nice, permanent office, dig out a 3x3 room with stone walls. If you're impatient, you can set up a temporary office anywhere. By now you should know how to construct and place a table and chair.
Use q to view the chair. The only option will be "r: make throne room or study." Choose this option, and you'll get the option to choose the size of the "study" with the secondary select keys. Notice that it conforms to walls and doors. Press enter once you've got a nice size. The last step is to assign the chair to our new bookkeeper with


