- v50 information can now be added to pages in the main namespace. v0.47 information can still be found in the DF2014 namespace. See here for more details on the new versioning policy.
- Use this page to report any issues related to the migration.
40d:Quickstart guide
| This article is about an older version of DF. |
This guide is intended to be used in conjunction with a save file downloadable here (5 meg download). By downloading it and unzipping it to your Dwarf Fortress directory you will be able to jump straight into a game where the first few hurdles have been overcome - a world has been generated, a location for the fort been selected, the starting skills and items have been bought, and the basic components of the fort completed.
This guide aims to explain what the graphics represent, how the menu and interface system works, and guide you through ordering your dwarves to perform a few simple tasks.
This guide and associated save file was created using version v0.28.181.40d. Thus, it will not work with version v0.31.01 or later.
What you will see when you load the game[edit]

The game will begin paused (don't unpause yet), centered on the meeting hall where all 7 of your starting dwarves are currently relaxing. The screen is divided into three sections. On the left is the active window, this is where you will see dwarves move around and where you issue orders. In the middle is the menu window. On the right is the fort view which gives you an overall view of the level (it's effectively a zoomed-out version of the active window).
You can rearrange this screen by pressing Tab. Press it a few times to enlarge the active window to maximum so we can have a look around.

Now we can see what is on the right of our meeting hall - it's unexplored underground space, shown by the large black area with scattered grey percentage signs and commas. The brown line is where I've ordered the miners to dig a new, explatory passage which I hope will find some minerals, gems or such. We'll cover how to order miners below.
By using the numpad keys you can move the active screen around and explore. The grey line that run roughly down the center of the image is the side of the mountain, you can see I've carved the fort straight into the side of it. On the lower left is a greenish area with a few blue patches. This is a mixture of grass, bushes, trees, and water. As opposed to the grey tiles in the centre which represent bare rock.
On the top left you will notice a lot of small dots and a blue haze. This is empty space. Although Dwarf Fortress may appear to be a 2D game, it is in fact 3D. You are currently looking at a top-down perspective of one z-level. If you were to move the active window down one level the empty space would become ground and the ground would become unexplored underground space. You can move the screen up and down by pressing < and > respectively (don't forget to hold on Shift!).
That's enough looking around, it's time to ...
Meet your dwarves[edit]
Dwarves[edit]
You currently have 7 dwarves and I've set up their skills and even given them nicknames to help you keep them sorted.
- Sue is a miner. Because mining is an important task I've disabled all her other labors so all she will do is mine - if you don't have any mining work designated for her to do she will return to the meeting hall.
- Matthew is a miner exactly the same as Sue.
- Jane is a woodworker. She carries a battle axe she uses to chop down trees and can then carve them into usable products at the carpenter's workshop. She also has a few skill points in Axedwarf, just in case you need to draft her into the military.
- Daniel is a stoneworker. She has several skill points in masonry so she can carve rock thrones, tables, doors and other such things. She also has a few skill points in mechanics so she can build rock mechanisms, which are required to create traps and some machines.
- Rachel is a craftdwarf. She has plenty of points in stone crafting so she can make trade goods before the Autumn caravan arrives. She also has a few points in bone carving so could make bone or shell armour from any creatures you kill.
- Juliet is a fisherdwarf. He will spend most of his time at ponds or creeks catching fish/turtle and leaving them on the shore to rot.
- Olon is a farmer. He can plant seeds at the farm and brew the mature plants into alcohol or cook them into food.
Creatures[edit]
You also have:
- 1 cat, which will hunt vermin for you.
- 2 dogs, which will hang around in the meeting hall most of the time. They will attack intruders if they get close, or can be trained, or leashed up to guard the entrance.
- A horse and a mule. If you purchase a male horse from a trade caravan then you could start breeding horses for meat, large stacks of bone (good for making practice crossbow bolts), and leather; however mules will not breed (nor do they in real life).
Items[edit]
Most of your supplies are still in the wagon. You have:
Unpause the game[edit]

That's enough introductions, time to get the game going. Once you unpause you will notice the dwarves scatter. Before saving the game I created a food stockpile in the pantry, most of the dwarves have gone to haul the food from the wagon to inside. Whereas Juliet is going to fish, and the miners will begin mining.
There are, however, several things I deliberately left unfinished so I can walk you through them. So let's start by pressing Tab to bring the menu window back. I'll be referring to it from now on (and generally it's easier to play with it there constantly).
Set tasks in workshops[edit]
We've got a Craftdwarf's Workshop all built and ready to go, but currently there are no work tasks there so Rachel is just going to ignore it (just like if you built a cinema complex but forgot to order someone to play the movies).
To find the workshop you can either press q to access the Set Building Tasks/Preferences menu and then move the cursor around using the Numpad until you find the workshop, but this can take a long time when your fortress grows in size. Instead you can press r to enter the View Rooms/Buildings menu, use Page Down (twice) to get the Craftdwarf's Workshop in view, then use ↑ ↓ to highlight the workshop. Press t to zoom to the workshop, and the Space to get back to the main menu.
Once you've found it you want to use the Set Building Tasks/Preferences menu, q, to set the work tasks. Once you hit q a yellow cursor will appear, simply move it around until you have the craft workshop selected.

Now the menu window displays the options for that building. Each different kind of building will have a different set of options. We want to add a new task. We are presented with a list of tasks (figure below) to choose from. Our miners have left plenty of rock lying around, so let's select that, g.

We get yet another list of tasks (figure below). Select Make rock Crafts by pressing Enter or c.

It has returned us to the first menu which will now have one task listed.

We may as well add the other three kinds of rock goods, and then set them to repeat by pressing r.

If a task is set to repeat then once it's completed it drops to the end of the task list (instead of being removed from the list). So now Rachel will sit in her shop constantly producing goods.
To keep her working steadily there is one other step you need to make: making sure she doesn't get distracted by other jobs.
Setting job preferences[edit]
By setting your dwarves to only perform one or two different labors you can ensure they spend all their time completing that job instead of running all round the fortress like headless chickens, trying to do everything at once.
First you need to find the dwarf in question. Now you can either use the view units option and hunt around the map until you locate the dwarf, or you can do it the smart way. Open up the unit list and you'll get a screen like this one:

Now scroll down to the dwarf you want and press Zoom creature. This will centre the screen on the unit and open the view units mode. So you'll see this:

From here we can get a lot of information on the dwarf. At the moment we're looking at general, but there is also inventory, preferences, and wounds. Go to preferences and you will get a new menu with new options, as shown below:

If you press labor then you will see a list of all possible tasks that a dwarf can perform. The first page of this list is shown in this screenshot:

Scroll using numpad + and - until you find the "Hauling" tasks on the 4th page:

Now press Enter to turn each one off and it should end up looking like this:

Using the job manager[edit]
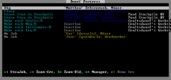
Fig 10: Open the job list
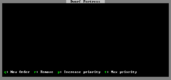
Fig 11: Open the job manager and select New order
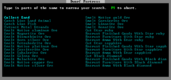
Fig 12: The job orders list
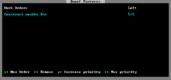
Fig 13: The job manager with one job displayed


I've already created a stockpile next to the craft shop for the finished goods to be put in. There is one flaw at the moment though - each good takes up an entire tile! What we want to do is create some wooden bins to store the items in, this has the added advantage that when the merchants arrive you only need to haul a few bins to the depot to trade the contents, instead of hauling each item individually.
Anyway, open the job list and you will see figure 10.
This details all the jobs currently underway and who is doing them. We're not too concerned with this information though, what we want is to get at the sub-menu job manager, which you can see at the bottom of the image. Open that up and you will see figure 11, a blank screen!
Not surprising, as we haven't used it yet to allocated jobs. Press q to start a new job and you will get a list of all possible jobs that can happen in a fort (figure 12). There are a lot.
Luckily we can search for what we want, so type in wood bin to shorten the list of jobs. Use ↑ ↓ to highlight Construct wooden Bin and select it using Enter. It will ask you how many, 5 sounds like a good number to me. After that it will return to the original job manager, except now it will have one new job as shown in figure 13.
The job manager automatically generates the job in the appropriate workshops. We have one carpenters workshop so it will generate 5 "produce wooden bin" orders. If we had 5 carpenters workshops it would produce one in each shop. Note that we don't currently have 5 logs available so soon Jane will start canceling tasks as quickly as the job manager creates them. You will need to designate more trees to be cut down (explained below).
Defining rooms[edit]
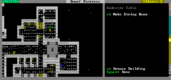
Fig 14: Select a dining table and make it a room
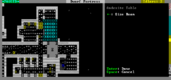
Fig 15: Size the room
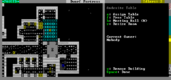
Fig 16: The dining table now forms the centre of a room, and the menu now displays the room options


Sometimes it isn't enough to place furniture to make it usable, but you also need to define a room from it. Bedrooms, tombs, meeting halls, and plenty more have to be created this way. In our fortress our dining room has plenty of tables and chairs for eating, but isn't actually a dining room yet.
Open up the Set Building Tasks/Preferences menu, q, again and move the cursor to one of the tables in the dining room (figure 14). It doesn't matter which one.
You will notice that this building has quite a different menu to the craft shop we looked at earlier. Press r to make this table into a room, then use the + - keys to get it to the maximum size (figure 15).
Press Enter to accept and it will return to the building menu, which now has new options because it is a room instead of a table (figure 16). Since we want this to be a public dining hall we don't need to change any of these options, so you can press Space to finish.
Using farms[edit]
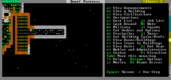
Fig 17: Two farms below the main fort
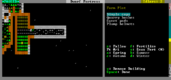
Fig 18: Select a farm and decide which crops to grow.


If you used the > to explore the z-level below the main fort you may have discovered this little room just below the pantry (figure 17).
This is two farms built in the arable sand layer, but no seeds have been planted yet. Once again use Set Building Tasks/Preferences menu, q, to get to the farm options (figre 18).
You will see a list of 4 different crops. At the moment we only have seeds for plump helmets and sweet pods. So choose which you want to plant in each farm. But! note that there are 4 different seasons. The current menu is only displaying spring so press b c d to get to summer, autumn and winter respectively and choose which crop to plant in each season.
Plump Helmets have a short growing cycle and can be eaten, cooked, or made into Dwarven Wine, so they are a staple crop.
Sweet Pods are made into Dwarven Rum. Variety is important or your dwarves will complain!
[edit]
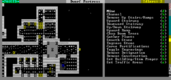
Fig 19: The designation menu
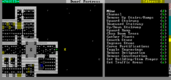
Fig 20: Select Mine and set the first point on the exposed wall
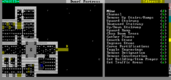
Fig 21: Set the second point somewhere in the unmined space

Fig 22: Select Up staircase and place it

Fig 23: Move up one z-level and place a Down staircase


The designation menu is one of the most important in the game. It allows you to mine out new areas of your fort, chop down trees, gather plants, etc. We want to define a new shaft for our idle miner, so select dig (figure 19).
Now scroll the cursor to where you want to begin the shaft and press enter. Obviously we want to start it at a wall the miner can reach! (Figure 20)
Then scroll to where you want it to finish and press enter again. A brown line will appear like in figure 21. Note that you can designate entire rectangles to be mined, not just a single line like I did.
Now let's create a staircase to access the next level up. First designate an up-stair on the current level (figure 22): press u, then Enter twice.
And now the tricky bit - move up one level (<) and designate a down staircase directly above it (figure 23) by doing j, then Enter twice.
To get Jane the woodworker to chop down trees, go to the outdoors west of the indoor rooms, select t from the designation menu, press Enter to select one corner of a rectangle, use the arrow keys to move to the opposite corner of the desired rectangle, and press Enter again; all of the trees inside of the rectangle will be highlighted to indicate that they've been designated for cutting. If you've selected too many trees you might later need to turn off Jane's Wood Cutting labor to get her to stop cutting trees and start making bins out of the trees she's already cut.
Creating workshops[edit]
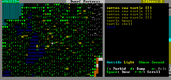
Fig 24: Rotting turtles surround a pond
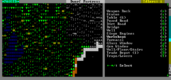
Fig 25a: The Site building menu
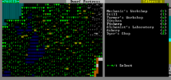
Fig 25b: The workshop sub-menu
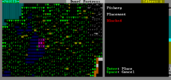
Fig 26: Placing the fishery


Juliet has been busy catching turtle, unfortunately he's been too busy to clean and gut them, so they've been rotting on the pond side (figure 24).
We want to build a fishery nearby to fix this problem. First open the Site a building menu and you will see a list of all possible buildings (figure 25A). Scroll down until you reach workshops, select that and you will get a sub-menu of all the workshops (figure 25B).
Once you select fishery a 3x3 block will pop up on the active window, representing how big the workshop is and where you want to build it. At the moment there is a tree in the way (figure 26), so move around until you find some clear ground close to the pond.
Once you have placed it you will be asked which materials you want to construct it out of. At this stage it doesn't really matter, but I suggest Andesite since it's closest (excluding the wood logs).
But this isn't enough. For one of your dwarves to actually construct the workshop they need to have the labor enabled that relates to that building ... and at the moment no one has fish cleaner nor fish dissector enabled. You need to select another dwarf and change his labors to include fish cleaning, as explained above. Preferably not Juliet (since the Fishing task takes precedence over almost all other tasks) nor any other dwarf that is busy with important tasks.
Once the fishery is complete you will need to set the task process raw fish at the workshop, and set it to repeat. Pretty soon you'll be churning out a good supply of meat to feed your fort. Also, since Juliet is catching turtle you will also get a nice little supply of shells that Rachel can then craft into goods.
Conclusion[edit]
Well, that's most of the basics covered. Next up I suggest you dig out an area near the pantry and build a still and a kitchen so you can begin brewing alcohol and cooking food (although plenty of food can be eaten raw). When the trade caravan arrives you will want to consult the trading page to learn how to trade with them.
I hope you have fun exploring the area, building some proper defences to hold off invaders, and dealing with an expanding population and the greater problems that they bring.